E-Archive
Interview
in Vol. 19 - January Issue - Year 2018
Advanced Characterization, Control And Inspection In Shot Peening: How To Address Challenges For Surface Finishing Of Critical Components

Cédric PILARD (left), International Sales Manager and Renaud FRAPPIER (right), Metallurgical Engineer and Head of Laboratory of SONATS

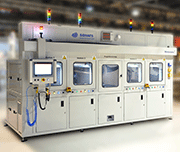
Ultrasonic shot peening machine, automotive engine parts

Fully integrated process

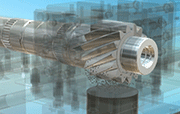
Stressonic - USP on automotive gear part

Residual stress profile
Dealing with finishing of critical components for various industrial sectors, customer quality requirements are more and more challenging. To understand how SONATS addresses these issues, MFN had the opportunity to gain an interview with Renaud Frappier (R.F.), Metallurgical Engineer and Head of Laboratory, and Cédric Pilard (C.P.), International Sales Manager.
(?) MFN: Could you please remind us what are key market tendencies?
(!) C. P.: SONATS has provided over 25 years of advanced shot peening solutions for several key industrial sectors such as aerospace, energy, medical, naval, defense and automotive. Downsized steel shafts and gears for high efficiency power transmission, turbine blades and disks designed with advanced superalloys, surface textured titanium human implants for better physiological acceptance: these are examples of advanced applications for SONATS solutions. Our ultrasonic shot peening solution can answer both high productivity requirements for automotive and ultra-high reproducibility for aerospace applications.
(?) MFN: Before describing the SONATS particular solutions, could you please simply summarize the challenges addressed by your customers?
(!) R. F.: Basically, our customers’ metallurgical and mechanical engineers have made huge efforts to design and produce parts with the highest mechanical quality: complex metallurgical microstructure for temperature resistance, very controlled thermochemical surface treatments for wear resistance, advanced machining strategies to achieve low geometrical and roughness tolerances. As the finishing process for fatigue design, shot peening is the most widely specified process to impart high compressive residual stress for fatigue life improvement. But this has to be done without distortion, and without damaging the surface roughness and the microstructural quality!
(!) C. P.: Well, some people also consider wheel blast and air blast shot peening as a random process because it is rather difficult to correctly control media impact energy or trajectory! That is why SONATS provides its Stressonic shot peening automated systems with advanced and highly controlled ultrasonic core technology. Our supervised machines can also be connected to other SONATS products and services like in-line Almen intensity validation, and off-line periodic residual stress measurement. Our most innovative product for 2018, will be our non-destructive testing system for on-line 100% inspection of coverage and residual stress.
(?) MFN: How would you introduce the Ultrasonic Shot Peening?
(!) C. P.: Firstly, please consider that Ultrasonic Shot Peening (USP) is not an exotic or laboratory treatment. We challenge traditional shot peening on every industrial application that you could imagine!
(!) R. F.: USP differs from traditional shot peening processes by the way kinetic energy is transmitted to the media. Instead of using a constant air flow, gravity or high-speed rotation of a turbine, USP uses the acceleration of a vibrating surface called a sonotrode. The frequency of vibration is within the ultrasonic wave range (20 kHz), which explains the name of Stressonic technology.
(!) C. P.: A generator delivers a sinusoidal electric signal that excites a piezo-electric transducer to convert this electric energy into a mechanical movement. The vibration must be amplified by a series of boosters in order to transmit enough kinetic energy to the sonotrode, which is directly in contact with the media. Between the sonotrode and the precise area to be peened, a specific enclosure is designed. Thus, just a few grams of media are hermetically contained in a controlled volume. Longitudinal vibrations of the sonotrode surface randomly disperse media inside the treatment volume as molecules into gas. This gas-like movement leads to a homogeneous treatment on all surfaces of the treated part.
(!) R. F.: Furthermore, we use highly spherical media like bearing steel or tungsten carbide balls from diameter 0.6 to 5.0 mm! They are severely controlled in SONATS workshop (material composition, diameter, sphericity, hardness and density), so these media are basically of much better quality than conditioned wire or cast steel shots. This is technically efficient and economically viable, since the quantity of media is very low.
(?) MFN: How is the process implemented in production plants?
(!) C. P.: We supply the equipment with different levels of automation. Firstly, for low-production rate applications or pre-series before ramp-up, semi-automatized solutions are provided with manual handling of the part and through man’s-height access window. The next step is our highly automatized machines, which include robotized handling and transfer. Additional specific functions such as media counting, media wear-out individual alarm and replacement, global supervision and periodical quality report insurance can be added upon customer request.
(?) MFN: Why would you say that this type of machine offers better control?
(!) C. P.: Since the treatment environment is constant (enclosure, working distance, time), we have a highly reliable way to control the parameters that characterize the process stability: vibration amplitude, media (quantity and quality), and cycle time. A closed-loop system is ensuring that the amplitude won’t vary. Media quantity – a few grams per cycle – and quality can be verified at each cycle by weighing and by automated inspection of the media.
(!) R. F.: The process in itself has an extremely high reproducibility and time stability. On some machines for the Aerospace industry, treatment conditions and parameters preconized after preliminary process application study 20 years ago are still applicable today!
(?) MFN: It sounds good. What do you mean by preliminary process application study?
(!) C. P.: SONATS is a unique structure because it offers to its customers a fully-integrated service to qualify new applications. Component manufacturers come to us and say, "I want an extremely reduced tolerance on Almen intensity F14A-F15A or "please shot peen this particular area of my component to induce superficial compressive stress as high as -1000 MPa and affected layer deeper than 300 µm".
(!) R. F.: The first step will be the preliminary process application study. Once we get the CAD of the part, our mechanical design engineers can simulate media trajectory. Then they recommend a dedicated treatment configuration and fabricate a specific enclosure by 3D printing. After selection of a couple of process parameters from our historical database, our process engineers would need a few specimens to carry out two or three trials for preliminary treatments. Then the laboratory analyses these treated parts in our own facilities according to qualified methods. We carry out everyday testing such as coverage evaluation, residual stress measurement by X-ray diffraction, residual stress measurement by incremental hole drilling, roughness measurement, CMM for distortion assessment, microhardness measurement, macrographic observation to check edge quality, micrographic observation for the presence of micro-cracks. The aim is to prove that specification requirements are reached and to give a fully comprehensive report to the customer. After that, the parameters are fixed and can be implemented in our automated production systems.
(!) C. P.: As already mentioned, we achieve lower roughness for the same intensity than conventional shot peening because of higher diameter and better sphericity of our media.
(?) MFN: Do these laboratory processes exist since SONATS was created?
(!) R. F.: Yes, we perform residual stress analyses by X-ray diffraction since 1991! We have developed materials characterization means and skills to provide today international services for residual stress measurement. We can carry out laboratory measurement if you send us the part. But we have earned a high recognition for field measurement on customer site, production shops, or construction area. We are experienced in quite harsh environments!
(!) C. P.: Please note that the lab has an independent activity and can measure your residual stress after casting, additive manufacturing, welding, machining, superfinishing, etc. No matter if it has to be performed on clean products or on components after nuclear or chemical environment services! These services are provided even if you are not interested in our shot peening solutions…
(?) MFN: Is there interesting outlook dealing with residual stress measurement?
(!) C. P.: Firstly, the main challenge is to maintain very high quality for our residual stress measurement results with the accepted methods: X-ray diffraction and hole drilling. We demonstrate to our customers that we have state-of-the-art measurement systems and highly skilled engineers.
(!) R. F.: Besides this, one of the main technical challenges is non-destructive testing of the residual stress profile! Indeed, today’s measurement of the residual stress profile is destructive and time consuming, say 1 day for a residual stress profile by x-ray diffraction after material layer removal. To address this issue, SONATS has made important R&D efforts and has developed over the past two years an advanced method based on a conventional magnetic test. After calibration for a specific component and process, the so-called Residual Stress Profiler is able to quantify coverage and impart residual stress in less than 0.5 second! This can fill an important gap of technology for non-destructive and high productivity testing of such a process and component. These technologies are today ready and have already been implemented for one aerospace customer. Today we are looking for a partner to develop it to its full industrial potential.
(?) MFN: Where can we meet SONATS in 2018?
(!) C. P.: First of all, you can find us in our headquarters in Nantes, France. Our American colleagues, Empowering Technologies Inc., are located in Trussville, Alabama, USA and a China office is located in Hangzhou near Shanghai. Also, we address all countries through a network of value-added representatives and technical partners (Germany, Sweden, Japan, South Korea, India, Russia…). Stressonic – our patented process – is also used in ultrasonic needle peening equipment, which is high frequency mechanical impact (HFMI) treatment for weld finishing, and multi-impact treatment for aluminum panel forming, straightening or shaping and stress corrosion applications. A handled portative system is also available and permits shot peening treatment for MRO without dismantling the part. Therefore, we address numerous markets worldwide.
(!) R. F.: We also participate in various international scientific, technical and business conferences dealing with surface finishing: metal treatment, shot peening, fatigue design, welding post-treatment. You may find our technical publications and announcements easily online. We also take part in normalization committee and collaborative research programs, and are very interested in any partnership for research in these areas.
MFN would like to thank Renaud Frappier and Cédric Pilard for this interview!
For Information:
SONATS
Europe Technologies Group
2, rue de la fonderie
44475 Carquefou, Nantes, France
Tel. +33.2.51 70 04 94
E-mail: contact@sonats-et.com
https://sonats-et.com/en


