E-Archive
Articles
in Vol. 16 - November Issue - Year 2015
Ultrasonic Impact Technology

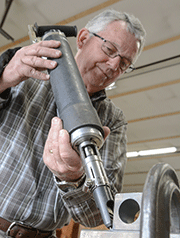
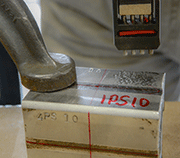
Sam Abston works with Beth Matlock in the TEC-USA Materials Testing laboratory to confirm UIT effects for a customer

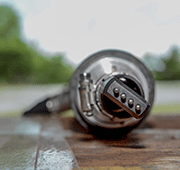
UIT equipment transmits ultrasonic frequencies into base metal at frequencies of 27 kHZ and uses a magnetostrictive transducer


The magnetostrictive transducer drives indenter pins, which impact the base metal surface, creating a plastically deformed surface layer while coupling the ultrasonic transducer to the base metal transmitting ultrasound through the thickness of the base metal / weld HAZ
Introduction
It has long been understood that the addition of compressive residual stresses at the surface and sub-surface of metallic components will enhance fatigue life. In 1890, the first US patent relative to this phenomenon was issued to B.C. Tilghmann. The patent was issued for a process that blasted the surface of components using small particles (shot peening).
Shot peening has been used to impart compressive residual stresses on the surface of components for a long time. The process provided industry with a method to extend fatigue life of components, relieve surface stress, and mitigate stress corrosion cracking (SCC).
While the benefits of shot peening related to compressive residual stresses have been understood for a long time, the maximum depth of compressive stress produced by shot peening has been limited to 0.020".
Over the past 15 years, a number of technologies have been evaluated that are designed to increase the depth of compressive residual stress without creating excessive cold work. Few technologies have successfully accomplished this goal. One of these technologies is Ultrasonic Impact Technology (UIT) from Applied Ultrasonics.
What is UIT and how does it work?
In the 70's, Ultrasonic Impact Technology (UIT) was developed in Russia to treat the hulls of nuclear submarines. The technology combined many of the attributes that have been known to enhance base metals and welds, providing greater fatigue life of materials and fabricated structures. The technology combined the attributes of ultrasound and mechanical impact to enhance the strength and life of fabricated structures by producing surface profile change, surface plastic deformation, heat affected zone (HAZ) grain modification, and compressive residual stress.
In the mid 90's, Applied Ultrasonics of Birmingham, Alabama, introduced the technology to the United States fabrication industry. Through third-party validation and research by major university research teams, the claims made by the Russian scientists were confirmed. It was confirmed that the technology would impart compressive residual stress into metals to depths up to 0.200" (5.0 mm); furthermore, the studies and research confirmed the fatigue life-enhancement and stress-relieving capabilities of the technology.
The principles of the UIT process is based on the transmission of ultrasonic frequencies into base metals at frequencies greater than 25 kHz. The technology uses a magnetostrictive transducer that oscillates at 27 kHz with a displacement of < 28µ. The magnetostrictive transducer drives indenter pins, which impact the base metal surface creating a plastically deformed surface layer while coupling the ultrasonic transducer to the base metal transmitting ultrasound through the thickness of the base metal / weld HAZ. The action of the indenter pins impacting the material surface creates plastic deformation, transmits ultrasound, modifies the grain structure of the HAZ, and induces compressive residual stress. The UIT process can provide a range of compressive residual stress depths through parameter selection. The attributes demonstrated by UIT have not been duplicated by any other life extension technologies (shot peening, TIG dressing, weld toe grinding, needle peening, hammer peening, etc.)
Verification by X-ray diffraction
The x-ray diffraction technique for measuring residual stress is an excellent tool for measuring depth-profiling stresses generated by UIT. Single-wavelength x-rays can precisely measure the distance between planes of atoms. When there is a stress in the material, the atomic spacing changes. By measuring the atomic spacing, one can calculate the stress that is present near the surface of the sample. This technique works equally well for compressive, neutral and tensile stresses. It is a direct measurement of strain and does not require any calibration samples.
Residual stresses are the stresses that remain behind in a part after all external loads are removed. They are the result of the manufacturing process and service history. Residual stresses are calculated from the elastic strains in a material, and by definition, are less than the yield strength of the material.
Plastic strains result when a material is stressed beyond the yield point. As the plastic strain increases in a material, the diffraction peak width will broaden; thus, the diffraction peak width is an indication of plastic strain in a part.
Because UIT generates significant compressive residual stresses at great depth, it is necessary to measure the stresses versus depth into the sample. The x-ray technique only measures stresses in the top few atomic layers. To measure the stress at depth, the surface material must be removed. Electrochemical polishing, or electropolishing, is an effective way of removing material without imparting a stress due to the removal process. Once an x-ray diffraction measurement is made, material can be removed by electropolishing and the new surface can now be measured. This process can be repeated until the final desired depth is reached.
The measured stress at each depth must be corrected for stress gradients and layer removal. X-rays penetrate the surface in a weighted manner (exponentially). If a stress gradient exists, the stresses need to be corrected to a normalized value. As material is removed, the remaining sample will change to offset the stresses that were in the removed layer. The layer removal correction is a mechanical correction that accounts for this change.
Measuring stress versus depth into a part enhanced by UIT shows that the beneficial compressive layer typically extends 1-2 mm into the surface. Furthermore, the level of plastic deformation (strain) is much less compared to conventional shot peening at and near the surface. The plastically deformed layer does extend further into the part for UIT, and is more uniform compared to a shot-peened part.
Benefits of Using UIT
The technology has changed the way industry views post weld enhancement methods and resulting life improvement capabilities. The improved compressive residual stress depths of UIT commonly relieve detrimental tensile stresses to a depth of up to 0.060" (1.5 mm), without the damaging excessive cold work. These benefits have earnt recognition and utilization of the technology by transportation authorities across North America, the offshore rig industry, the US Military, the mining industry, and manufacturers of automotive and truck components. The UIT process is currently being utilized by all of these industries for fatigue life enhancements and localized stress relief.
An additional benefit of the UIT process is sub-surface grain structure modification. This grain modification coupled with replacing detrimental tensile stresses with deep compressive residual stress enhances fatigue life as well as greatly reducing stress corrosion cracking (SCC) in base metals and welded components.
UIT is a progressive technology that has shown significant benefits in many industries where fatigue and SCC environments are prevalent. Additionally, improvements in residual stress distribution and low plastic deformation over great depths make this technology superior to conventional shot peening in welded structures.
For Information:
TEC / Materials Testing Division
Applied Ultrasonics, Sam Abston II
10737 Lexington Drive
Knoxville, TN 37932 USA
Tel. + 1.865.966 5856
Fax + 1.865.675 1241
E-mail: info@tecstress.com
info@appliedultrasonics.com
www.tecstress.com


