E-Archive
Articles
in Vol. 7 - July Issue - Year 2006
Quantify Your Peening… Where it Counts

Author James Pineault

Author Robert Drake
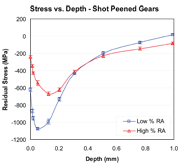
Figure 1: Effectiveness of peening
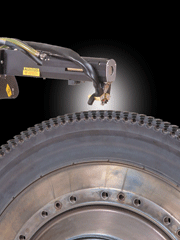
Figure 2: Measuring residual stress inside a blade retention slot of a turbine disk
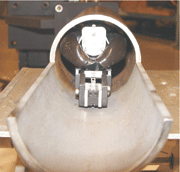
Figure 3: MG15P portable system measuring residual stress inside a 50 mm diameter pipe
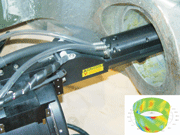
Figure 4: Miniaturization allows measuring of residual stress inside a landing gear trunion
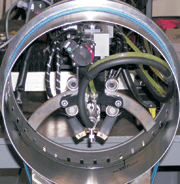
Figure 5: MGR40 portable system measuring residual stress inside a Space Shuttle main engine flow liner
The residual stresses present in manufactured components, assemblies and structures can significantly improve or diminish their useful life. Proto Mfg. Ltd. has been helping companies for over 20 years with the measurement of residual stresses in the laboratory, on the shop floor and in the field by providing both sales of standard and custom instrumentation as well as measurement services.
Almen strip alone is not enough
Peening is being used more and more frequently to increase the fatigue life of components. Peening provides the benefit of cold working the material and introduces compressive residual stresses into the surface layer of the component. This beneficial compressive residual stress layer provides increased resistance to cracking, corrosion and fatigue. The Almen strip is commonly used to monitor the peening process in an attempt to ensure peening is being applied correctly. While the Almen strip is an excellent tool for calibrating and monitoring the shot peening process, it is unable to provide direct information about the resulting residual stress state of the component. This direct information can only be obtained by measuring the residual stress in the component itself after the peening process. The post peening compressive residual stress state depends on many factors, including the type of shot, the peening intensity, the incident angle of the shot material, the peening time, the material properties and the residual stress state prior to peening. In cases where the component is composed of a relatively hard material, where only a small amount of cold working occurs as a result of peening, upstream processing stresses (tensile stresses) may not be completely eliminated. Residual stress measurements can also uncover differences in residual stress due to phase composition (see Figure 1). Fortunately, there is an accurate, reliable and consistent method available to quantify residual stresses in a peened component – X-ray Diffraction (XRD) Residual Stress Measurement.
Innovative systems to measure residual stresses
Quite often, the failure of critical locations in components involves complicated geometries. The traditional Almen strip is a flat coupon and this variation from the geometry of certain components can cause uncertainty in the actual resultant residual stresses achieved by peening it. Historically, many of these complicated geometries have been difficult to measure using XRD and typically involve a combination of strain gauging and sectioning to allow access to perform a residual stress measurement. However, advances in technology have enabled the creation of instruments that are very robust and capable of measuring on almost any component geometry.
It is well known that machining operations produce surface conditions that can either enhance or debit the fatigue life of production components; peening processes are thus often implemented to maximize the performance of many such components, including turbine engine disks. In the case of turbine engine disks, it is also very important to understand the LCF behavior of the materials used, particularly with respect to the influence of elevated operating temperature. Portability and built in degrees of freedom are thus important elements required for the measurement of critical high stress locations of complicated geometry such as those found in turbine engine disks (see Figure 2).
Environmentally assisted cracking, also known as stress corrosion cracking (SCC), is a major source of potential failures in the process industries, in pulp mills, in storage vessels, and even in aircraft. Tensile stress resulting from the superposition of residual and applied stresses is the main component of the SCC triangle: the other two are a susceptible metal and an environment that often needs to be only slightly corrosive to that metal. Engineers have long recognized that an effective solution for the retardation or even prevention of SCC is the introduction of compressive stresses; this is commonly accomplished by shot peening. The introduction of sufficient compressive residual stress and associated cold working can be verified by XRD measurement. Miniaturization of the x-ray goniometer (measurement head), x-ray detectors and x-ray tubes now allows access to small diameter bores when components are susceptible to SCC and must be characterized on the bore i.d. (see Figures 3 and 4).
Residual stress mapping generates a comprehensive picture of the residual stress state on key areas of a component. Where surface stress gradients are found to exist, such as those in the bore of the landing gear trunion shown in Figure 3, they can be mapped and subsequently plotted for analysis. This data can also be superimposed on Finite Element Model (FEM) predictions or known loading spectra to improve the accuracy of life prediction and/or fracture mechanics models when required.
Portable equipment enables evaluation on-site; residual stress measurements such as those required on the Space Shuttle Main Engine (SSME) flow liner, require a portable system with sufficient degrees of freedom to measure in any direction inside the bore (see Figure 5). The inner diameter of bolt holes can also be measured without the need for sectioning or destroying the component with the appropriate equipment configuration (see Metal Finishing News, Vol. 5, July Issue, 2004 p. 23-24).
X-ray diffraction provides quantitative residual stress measurement results
The absolute residual stress as a result of peening can be easily quantified by calibration of the x-ray diffraction system with the X-ray Elastic Constant (XEC) of the material being peened. This parameter is consistent for a given material and is not affected significantly by grain size, heat treatment or cold work and therefore can be used to ensure accuracies of up to 10 MPa on shot peened materials.
Ensure peening quality, effectiveness and minimize costs
Determining the effectiveness of the peening with residual stress measurement generates quantifiable data that can be used to help optimize component specific peening parameters. Peening intensity, time and setup can be adjusted to obtain optimal compressive residual stress on each peened component. Overpeening and unnecessary peening time can be minimized with great economic benefit.
Summary
While the Almen strip is excellent for monitoring the peening process, residual stress measurement is proving to be an important partner in the peening process, thus ensuring each component receives the greatest possible benefit from peening.
For information:
Proto Mfg. Ltd., 2175 Solar Crescent
Oldcastle, Ontario, Canada, N0R 1L0
Tel: +1.519.737 6330, Fax 737 1692
email: xrdlab@protoxrd.com
www.protoxrd.com


