E-Archive
Science Update
in Vol. 11 - July Issue - Year 2010
Suppression of Fatigue Crack Propagation in Steel by Cavitation Peening
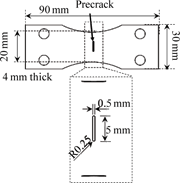
Fig 1: Specimen for fatigue test
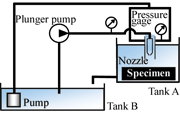
(a) CP apparatus
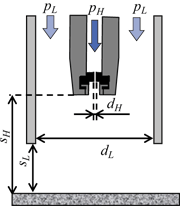
(b) Nozzle geometry Fig 2: CP apparatus and Nozzle geometry
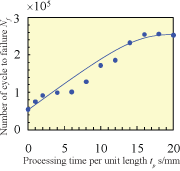
Fig 3: Increase in fatigue life with processing time of CP
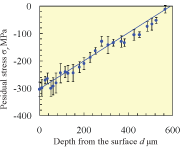
Fig 4: Stress distribution introduced by CP
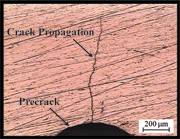
Fig 5: Crack propagation on the surface
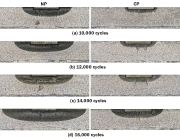
Fig 6: Photograph of the fatigue crack propagation in NP and CP specimen
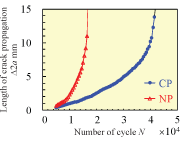
(a) Comparison of crack propagation behavior between CP and NP specimens
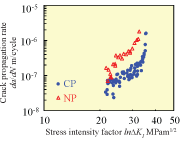
(b) Relationship between da/dN and ?KI Fig 7: Suppression of crack propagation by CP
Introduction
Methods such as cavitation peening, shot peening and laser peening are well known as techniques for enhancing the fatigue life of mechanical components [1,2] and mitigating the stress corrosion cracking caused in structural materials for power plants by introducing compressive residual stress on the surface layer [3-5]. In real application, in order to promote the use of peening for fail safe design, it is required to suppress the critical damage during long-term operation of machinery and power plants. Thus it is essential to know the characteristics of fatigue crack propagation of the material and select the effective peening method to suppress the fatigue crack propagation. This paper demonstrates that the fatigue crack propagation can be greatly suppressed by cavitation peening.
Cavitation impact generated by collapsing bubbles causes severe damage in hydraulic machinery. Soyama et al. succeeded in harnessing this impact for utilizing as surface modification in the same way as shot peening by controlling the collapsing bubbles in a cavitating jet. The technique used in this way is called "cavitation shotless peening (CSP)" [1,2,6,7] as shot is not required or simply "cavitation peening (CP)". One of the major advantages of CP is that the peened surface is very smooth compared with a shot peened one, and another is that CP can peen in deep narrow regions where the stress is more concentrated. For this reason, CP is a very effective technique for enhancement of the fatigue strength, and it can be expected to suppress the fatigue crack propagation.
In this paper, stainless steel specimens treated by CP with and without a pre-crack were tested for comparison with non-peened (NP) specimens using a plate bending fatigue test and the crack propagation rate evaluated by observation under a microscope in order to demonstrate that CP suppresses the fatigue crack propagation.
Specimen for Fatigue Test
Figure 1 shows the geometry and dimensions of the specimen. The pre-crack was introduced by machining after CP, and the material under test was austenite stainless steel Japanese Industries Standards JIS SUS316L used for structural materials of power plants.
Cavitation Peening
Figure 2 shows a schematic illustration of CP apparatus and the nozzle geometry for CP using a cavitating jet in water with associated water which is one of the CP techniques. The high-speed water jet is pressurized by a plunger pump and injected into the low-speed water jet which is pressurized by a turbine pump and injected into the water filled chamber. The injection pressures of high-speed water jet pH and low-speed water jet pL were 30 MPa and 0.02 MPa, respectively. The nozzle throat diameter of the high-speed water jet dH and that of the low-speed water jet dL were 2 mm and 60 mm, respectively. In addition, the stand-off distance between the nozzle for the high-speed water jet and the low-speed water jet and the specimen sH, sL were 140 mm and 80 mm, respectively. The processing time per unit length tp was 0 ~ 20 s/mm at intervals of 2 s/mm.
Fatigue Tests without Pre-crack
The fatigue tests were conducted using specimens without pre-crack in order to optimize the processing time of CP. The bending stress was generated by eccentric rotation which was set to 700 rpm and the initial bending stress was set to 400 MPa. Figure 3 shows the increase in the number of cycles to failure Nf as a function of the processing time of CP. As shown in Fig. 3, the number of cycles to failure Nf of NP specimen (tp = 0 s/mm) is about 60,000 cycles, and it becomes 240,000 cycles at tp = 16 s/mm and then saturates after tp = 16 s/mm. This result indicates that the optimal processing time of the present apparatus is 16 s/mm.
The compressive residual stress distribution in the depth direction introduced by CP at processing time 16 s/mm was evaluated using X-ray diffraction (sin2? method) and electrical polishing. Figure 4 shows the compressive residual stress introduced by CP as a function of depth from the peened surface d at processing time tp = 16 s/mm. The residual stress of NP specimen (tp = 0 s/mm) is -10 MPa on the surface. As Fig. 4 indicates, the compressive residual stress on the surface layer introduced by CP is about -300 MPa. It slowly decreases along with depth from the surface, and the compressive residual stress is introduced at d < 600 ?m.
Fatigues Tests with Pre-crack
In order to evalate the effect of cavitation peening on crack propagation rate, the fatigue crack propagation tests were conducted using specimens with pre-crack which were peened by optimal processing time 16 s/mm. The initial bending stress was set to 350 MPa. The length of the fatigue crack was measured every 500 cycles using a microscope as shown in Fig. 5, and the cross-section of the fatigue crack in NP and CP specimen (10,000, 12,000, 14,000, 16,000 cycles) was observed using specimens in the same condition. The fatigue cracks in the specimens used for observation of the cross-section were colored by high temperature oxidation. The photograph of the fatigue crack propagation in NP and CP specimens is shown in Fig. 6. This figure indicates that the fatigue crack propagation in CP specimen is slow compared with NP specimen. From this observation, the fatigue crack propagation can be greatly suppressed by CP.
Figure 7 shows the length of the fatigue crack propagation from pre-crack ?2a as a function of the number of cycle N and the fatigue crack propagation rate da/dN as a function of the stress intensity factor ?KI, respectively. As shown in Fig. 7(a), the fatigue crack propagation from pre-crack ?2a of NP and CP specimens (tp = 0 s/mm, 16 s/mm) are about 2.4 mm and 0.9 mm at N = 10,000 cycles, respectively. In the case of NP specimen, the crack length rapidly increases after N = 10,000 cycles and then the crack grows to failure at N = 16,500 cycles. On the other hand, in the case of CP specimen, the fatigue crack length slowly increases until about N = 35,000 cycles and then the crack grows to failure at N = 42,000 cycles. As Fig. 7(b) indicates, the crack propagation rate da/dN for NP and CP specimens rapidly increases at about ?K = 22 MPa m1/2 and the propagation rate becomes in accordance with the Paris law within ?K = 22 ~ 34 MPa m1/2, and it rapidly increases after ?K = 34 MPa m1/2. At ?K = 24 ~ 26 MPa m1/2, the average of the crack propagation rate of NP and CP specimens are 0.288 ?m/cycle and 0.092 ?m/cycle, respectively. From those results, the average of crack propagation rate of the CP specimen decreases by 70 % compared with the NP specimen. It is quite likely that the compressive residual stress introduced within 600 ?m depth from the surface by CP is one of the major factors of the suppression effect.
Conclusions
In order to demonstrate that CP suppresses the fatigue crack propagation, the austenite stainless steel JIS SUS316L was peened by CP, and the residual stress introduced by CP and the fatigue crack propagation rate were evaluated by X-ray diffraction and plate bending fatigue test, respectively. The results demonstrate that CP introduces the compressive residual stress until 600 ?m depth from the surface, and CP suppresses the fatigue crack propagation rate by 70 % compared with the NP specimen by introducing compressive residual stress.
Acknowledgement
This work was partly supported by the Japan Society for the Promotion of Science under Grant-in-Aid for Scientific Research (A) 20246030 and 22-2438.
References
1. Soyama, H. and Macodiyo, D.O., 2005, “Fatigue Strength Improvement of Gears Using Cavitation Shotless Peening,” Tribology Letters, Vol. 18, No. 2, pp. 181-184.
2. Soyama, H., Shimizu, M., Hattori, Y. and Nagasawa, Y, 2008, “Improvement of the Fatigue Strength of the element of a steel belt for CVT by cavitation shotless peening,” Journal of Materials Science, Vol. 43, No. 14, pp. 5028-5030.
3. Dewald, AT., Rankin, JE., Hill, MR., Lee MJ. and Chen HL., 2004, “Assessment of Tensile Stress Mitigation in Alloy22 Welds Due to Laser Peening,” Journal of Engineering Materials and Technology, Vol. 126, No. 4, pp. 465-473.
4. Sano, Y., Obata, M., Kubo, T., Mukai, N., Yoda, M., Masaki, K. and Ochi, Y., 1995, “Retardation of crack initiation and growth in austenitic stainless steels by laser peening without protective coating,” Materials Science and Engineering A, Vol. 417, No. 1, pp. 334-340.
5. Sagawa, W., Aoki, T., Itou, T., Enomoto, K., Hayashi, E. and Ishikawa, T., 2009, “Stress corrosion cracking countermeasure observed on Ni-based alloy welds of BWR core support structure,” Nuclear Engineering Design, Vol. 239, No. 4, pp. 655-664.
6. Soyama, H. and Yamada, N., 2008, “Reliving Micro-strain in a Polycrystalline Metal Surface by Cavitation Shotless Peening,” Materials Letters, Vol. 62, No. 20, pp. 3564-3566.
7. Soyama, H. and Sekine, Y., 2010, “Sustainable Surface Modification Using Cavitation Impact for Enhancing Fatigue Strength Demonstrated by a Power Circulating-Type Gear Tester,” International Journal of Sustainable Engineering, Vol. 3, No. 1, pp. 25-32.
Osamu Takakuwa
Graduate student
E-mail: o_takakuwa@mm.mech.tohoku.ac.jp
Masaaki Nishikawa (Dr. Eng.)
Associate Professor
E-mail: nishikawa@mm.mech.tohoku.ac.jp
Hitoshi Soyama (Dr. Eng.)
Professor
E-mail: soyama@mm.mech.tohoku.ac.jp
Department of Nanomechanics
Tohoku University
6-6-01 Aoba, Aramaki, Aoba-ku, Sendai
980-8579, Japan


