E-Archive
Science Update
in Vol. 17 - January Issue - Year 2016
Shot Peening Effects on Fatigue Performance of Aircraft Alloys

Table 1: Tensile properties of conditions T4 and T6 in Al 6061

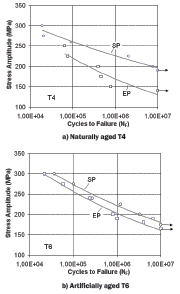
Figure 1: S-N curves in rotating beam loading (R = -1) of Al 6061

Figure 2: Microhardness-depth distributions in 9310 steel comparing conditions carburized with carburized plus shot peened

Figure 3: Residual stress-depth distributions in 9310 steel comparing conditions carburized with carburized plus shot peened

Figure 4: S-N curves in rotating beam loading (R = -1) of 9310 steel (norm = normalized, carb = carburized)

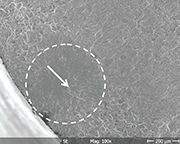
Figure 5: Fatigue fracture surface (SEM) of condition carburized + shot peened (circle indicates crack nucleation (arrow) and region of early crack propagation below the surface)

Figure 6: Surface appearance after shot peening with 20% coverage and 90° impact angle

Figure 7: S-N curves of shot peened (0.20 mmA) Ti-6Al-4V with 20 and 100% coverages

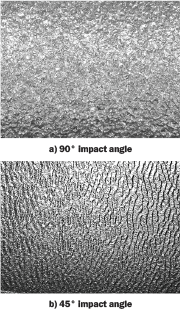
Figure 8: Surface topography after shot peening with various impact angles
This article covers recent work on shot peening effects on selected aircraft alloys such as aluminum alloys, steels and titanium alloys performed at the Technical University of Clausthal. Of particular importance was to outline the effects of aging on Al 6061, of carburizing on the low alloy steel 9310 and of coverage degree and impact angle during shot peening on Ti-6Al-4V.
Al 6061
Natural T4 and artificial T6 tempers were performed on Al 6061 resulting in tensile properties as shown in Table 1.
Fatigue performance is illustrated in Figure 1 comparing the electrolytically polished baseline (EP) and the shot peened (SP) conditions of the naturally aged T4 (Fig. 1a) and artificially aged T6 (Fig. 1b) tempers.
As seen in Figure 1, the effect of shot peening is much more beneficial in T4 (Fig. 1a), compared to T6 temper (Fig. 1b). Presumably, this result is related to the more marked work-hardening in T4 already indicated in the tensile properties (Table 1).
Steel 9310
This steel was received in a normalized condition. Carburizing the rotating beam samples was done at 900 °C for 4 hours to increase the hardness of the surface and near-surface material. A clear gradient in hardness was found with maximum hardness values of 870 HV 0.1 at the surface decreasing to 420 HV 0.1 deeper in the bulk (Fig. 2).
As expected, shot peening did not further increase the hardness of the carburized surface layer (Fig. 2). Interestingly, shot peening of the carburized specimens leads to much higher residual compressive stresses than carburizing alone (Fig. 3).
The fatigue performance of the various conditions of the 9310 steel is illustrated in Figure 4.
While shot peening of the normalized condition only slightly increases the fatigue strength from about 400 to 450 MPa, carburizing already results in a marked increase in the fatigue strength to about 700 MPa. The highest increase of the fatigue strength to about 1200 MPa was found in the condition carburized + shot peened. This effect is clearly related to the high shot peening-induced residual compressive stresses (Fig. 3).
As indicated in Figure 5, fatigue crack nucleation in the shot peened carburized specimens took place below the surface.
Ti-6Al-4V
The effect of a low coverage peening of about 20% on surface appearance is shown in Figure 6.
The fatigue performance after 20% coverage and full (100%) coverage shot peening is compared in Figure 7.
The fatigue strength after low coverage peening is about 625 MPa, whereas it is about 735 MPa after 100% coverage peening.
The change of the impact angle in shot peening to 100% coverage clearly affects the surface topography as indicated in Figure 8.
Acknowledgements
The experimental help of Mozhgan Gholami, M.Sc. and Mahmoud Basha, M.Sc. in performing fatigue testing is gratefully acknowledged .
Literature
Proceedings of the 12th International Conference on Shot Peening (L. Wagner. ed.) 2014, ISBN 971-3-00-047738-6
L. Wagner, M. Wollmann
Institute of Materials Science and Engineering, TU Clausthal, Germany
E-mail: lothar.wagner@tu-clausthal.de
K. McClurg
Avion Solutions, Inc., Huntsville. Al, USA
J. Fuhr
Metal Improvement Company, Surface Technologies Division Curtiss-Wright, Unna, Germany


