E-Archive
Interview
in Vol. 18 - July Issue - Year 2017
Advanced Stress Testing Technology For Shot Peened Surfaces

Dominik Dapprich, Managing Director of Stresstech GmbH
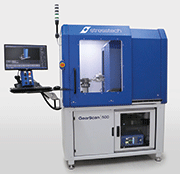
GearScan 500 is our latest instrument for checking the quality of gears with the Barkhausen Noise
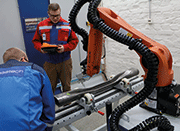
Xstress Robot is being set up for automatic residual stress measurement from a large part with X-ray diffraction technology
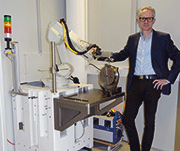
Dominik Dapprich, Managing Director of Stresstech GmbH introducing X-ray measurements being made with Xstress Robot
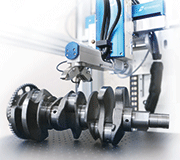
Xstress 3000 G3 measures residual stresses on a crankshaft
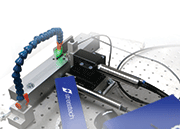
Prism hole-drilling instrument measuring residual stresses
An interview with Dominik Dapprich, Managing Director of Stresstech GmbH - Residual stress measurement and microstructure testing tools since 1999.
(?) MFN: Mr. Dominik Dapprich, we are happy to do this interview with you. Can you tell us something about yourself first?
(!) D. D.: First of all, thank you for the invitation to this interview.
My education is in classical engineering. I graduated from Technische Hochschule in Darmstadt in 1994 with a Diploma in Engineering, specializing in aviation technology.
I did my Diploma Thesis at Buderus Sell, and then continued working for that company for two years, designing and developing commercial aviation galleys and cabin interior.
I started in 1996 as a sales engineer for Stresstech products. In 1999, Stresstech GmbH was founded in Germany, and I became its managing director. Those early years were important for the further application development of Barkhausen Noise technology. My engineering background about production technology helped to understand customer´s needs, and in turn, refine Stresstech´s product line.
(?) MFN: Has working style changed a lot during the past years?
(!) D. D.: Definitely. When I started, the Internet had just been launched, and was being used merely as a toy. Nobody in the industry was using email. We were sending paper letters, faxes, and of course making phone calls. For younger people, this may sound unbelievable…
Measurement technology made its step from analog signal processing to digitalization, as Stresstech did it with the introduction of the Rollscan 300 series. The computing power of the current Rollscan 350 digital signal processor is light-years above the technology of the 1990´s, giving it a lot of potential for advanced testing tasks.
In residual stress measurement, Stresstech was pioneering from the beginning, direct exposure line detector technology. This feature nowadays has become something like an industry standard, and especially if customers are aiming for ultra-fast measurement, the latest detector technology allows measurements to get done in a few minutes, which 20 years ago could take several hours with questionable result quality.
(?) MFN: Can you describe the historical development of Stresstech´s technologies?
(!) D. D.: Stresstech started in 1983 with Barkhausen Noise Analyzers, called the Rollscan systems. Barkhausen Noise method is a magnetic method preferably used to monitor grinding process quality. Fully automated systems enable 100% testing for mass production workpieces, separating good samples from bad ones, and providing measurement data for a precise control of the machining process by the production engineer. Currently, we are developing a new application from this method, which will provide non-destructive testing of hardness depth.
It is important for our customers to know about our turnkey solution capability. Regardless if it may be a small, manually operated system for few random production quality checks during a shift, or a fully automated, robotized testing system for very heavy parts like crankshafts or large gears, weighing hundreds of kilos.
With the X-ray diffraction method, you can find absolute values for stresses. X-ray measurement is a static measurement, which is why it is most often used in production development such as finding correct shot peening parameters. Our Xstress instruments using this method consist of the main unit, three alternative types of goniometers for handling the measurement head including a fully robotized system, and XTronic software for calculating the stresses. The Xstress robot goniometer takes advantage of a six axis, high precision robot, which handles all goniometer movements such as tilting and rotations. It can be coupled with a seventh axis, for example, to rotate larger samples into different measurement positions. Various types of accessories from safety cabinets to work tables can be designed for making the measurements as safe and convenient as possible.
Additionally, Stresstech supplies the Prism hole-drilling instrument for the measurement of residual stresses in cases where X-ray method does not work, such as casting, extruded aluminum or non-crystalline materials. Prism instruments consist of equipment for precision drilling of the hole taking photos under laser illumination before and after drilling, and then analyzing them with special PrismS software.
(?) MFN: Stresstech provides different technologies for stress and microstructure analysis. Can these technologies be seen as complementary?
(!) D. D.: As stated before, the company started with the magnetic method called Barkhausen Noise. In 1990, we added X-ray diffraction to our expertise and product line, because we quickly understood we needed to have a tool that measured residual stress quantitatively. Nowadays, in most new applications of Barkhausen Noise, we do residual stress analysis of the samples to understand the metallurgy and the production process better, and to customize the Barkhausen sensors.
For those hard-to-measure materials, we use the hole-drilling method. All of these methods have unique features, which no one else has ever applied before.
Our offices provide measurement services for many customers. We can send a Stresstech specialist anywhere in the world for on-site measurements – like a shipyard for example, when a critical component of a pressure vessel needs to be tested.
We are a global organization with the head office in Finland, and offices in Germany, USA and India, and a branch office in Sweden. We also have a representative network in more than 20 countries worldwide.
Most of our customers belong to the transportation industry, e.g. to car, truck, heavy equipment, and aircraft manufacturers. Recently the energy sector has become more important for us. The newest exciting field is welded structures made from high strength steels.
(?) MFN: Stresstech has been doing business with residual stresses for over 30 years now. Which strategy do you use to meet the market’s needs?
(!) D. D.: From the very beginning, our main goal has been to measure residual stresses. We have been able to keep this goal very well over thirty years. We have systematically expanded our product line so that we can offer solutions to as many residual stress measurement cases as possible to our customers. Barkhausen Noise technology can only be applied to ferromagnetic materials, so we expanded to X-ray diffraction in order to offer better coverage. Because the XRD method has limitations with non-crystalline materials, we went to ESPI hole-drilling with our Prism instrument for those cases where XRD does not work.
Product quality is always the critical issue at stake for our customers, so our goal is to provide them with solutions to achieve and maintain their product quality. Residual stresses incurred during the production process are an important issue in the customer’s quality control maintenance.
We have invested many resources to make it easier to perform stress measurements with easy-to-use software and automated measurements, which mean fewer user errors. We do service measurements for customers that need only occasional measurements, or want to know if our methods can solve their needs.
Our main goal is to help our customers improve the performance of their products. We offer our customers tools to measure stresses by providing them instruments to easily study stresses in their products to get to the positive result in their own manufacturing processes. With the help of our products, our customers can easily spot the weak points in their production process or verify that the process works the best possible way and that their products fill the set quality demands. Defects in their products or problems in their processes can result in remarkable costs or irreplaceable damage to their image.
We work very closely with our customers, because our sensors and stands are usually custom-made according to the specific needs of the part or surface to be measured or e.g. automation demands.
(?) MFN: How are your residual stress measurement systems different from other systems on the market?
(!) D. D.: For X-ray diffraction, we have a unique detector technology and geometry. For ESPI hole-drilling, our technology uses laser interferometry instead of strain gages, which are time consuming to handle. Miniaturization and modularization help to design simpler and more compact systems with less cabling, as every unit can work independently. This results in a tidy and clean work arrangement and greatly improves the handling and measurement quality.
(?) MFN: Can you present to us at least some of its advantages?
(!) D. D.: BN technology is a superior testing method compared to the traditional temper etching method, which uses chemicals. Barkhausen Noise technology is environmentally responsible, does not require any consumables, and is easy to automate and document test results. Furthermore, BN gives a very early indication of the defect at a stage, when nital etch does not yet give any indication, making it a really precise tool for production control.
In the XRD side, we have developed our systems to be compact, flexible and fast, and all are in compliance with ISO 15305:2008. We try to keep things simple wherever possible to ensure a reliable working system that is easy to operate. A nice example is the automatic determination of the measurement distance by a touchdown. If you investigate fancy laser distance meters a little closer, you find many drawbacks, which are not reliable. This may result in wrong measurement results that may not be noticed by the user. Our simple hardware design makes it easy to use our equipment in field conditions where you do not want to deal with complicated setups. Our new product Xstress Mini also works according to ISO 15305:2008, it is extremely compact and simple to operate. It will be very useful to measure residual stress anywhere outside, on steel bridges, railway tracks, pipelines etc.
Measurement speed is a real cost-saving factor. If a customer needs a really fast system, we can provide the solution with our Xstress systems and new detector technology, reducing measurement time to single minutes on hardened steel samples, and even on curved surfaces and small measurement spot sizes.
The main advantage of our hole-drilling equipment is that it eliminates the need for strain gages. This alone makes total measurement times much faster than with traditional hole-drilling method with strain gages. With our method, you also get information around the hole in every direction, whereas with the strain gage method, you measure typically only in three directions.
(?) MFN: How do you approach quality assurance process, and product development?
(!) D. D.: We have been ISO 9001-certified since 2001, and our service lab in Finland is certified according to EN IS0 17025. Our German and American labs will also have this certification in the near future. We have designers and quality persons specifically focused on quality control issues full-time.
Product development is part of our daily process. Nevertheless, the most important driving force is customer feedback and requests for new or custom solutions.
(?) MFN: Give us an insight into the market that you serve.
(!) D. D.: Any kind of vehicles that moves on land or in the air has components that need to be stress measured, or microstructure controlled. So, the transportation industry is clearly our major application field. If I would be asked to name typical mechanical engineering products, I would first count gearwheels and ball or roller bearings. Those components are highly stressed, have to carry heavy loads, are made with a specific metallurgy to create certain microstructure – and need to be quality controlled. The components we are dealing with are expensive and critical, for example, high strength material such as camshafts, crankshafts, bearings, gears, landing gears etc. Shot peening is one of the most important applications in the surface treatment field, and nowadays we see other technologies emerging for surface treatment, like cold rolling, pneumatic or ultrasonic impact treatment, and laser shock peening.
(?) MFN: Do you like to be an engineer, and to work with technologies that are not commonly used in industry?
(!) D. D.: Yes. Since being a schoolboy, I wanted to become an engineer. I enjoy learning and discussing the latest production technologies pro´s and con´s with our customers and consulting with them about which of our technologies would be the best to support their quality or development processes. The broad application of our products in very different industries fascinates me. You can discuss one day, the testing of a 2-ton gearwheel of a windmill gearbox on site with the customer, and the next day, you will draft solutions to measure residual stress on tiny fuel injection nozzles, of which you can fit 25 pieces into your hand.
(?) MFN: Any final thoughts?
(!) D. D.: I would say the future looks very promising – we have a lot of work in front of us, which is good in any case! It is generally understood, that the demand for measuring residual stresses is expanding all the time. More and more workpieces are made from high strength materials, which are sensitive to defects such as wrong residual stresses. On the other hand, weight saving is a must nowadays, which means safety factors are coming down, and errors in production quality may cause the workpiece to fail unexpectedly or much earlier after its calculated lifetime. Many samples receive surface treatment such as shot peening to achieve the benefits of its materials strength – but it must be a controlled process, which requires stress measurement.
MFN would like to thank Dominik Dapprich for this interview!
For Information:
Stresstech GmbH
Konnwiese 18
56477 Rennerod, Germany
Tel. +49.2664.99731-0
E-mail: dominik.dapprich@stresstech.de
www.stresstech.com
www.stresstech.de


