Introduction
Additive Manufacturing (AM) technology has brought numerous benefits to mankind, with the benefits of the technology including the manufacturing of complex shapes and lightweight parts, easy customization, design freedom, etc. [1]. Improper surface properties in terms of surface quality (SQ) and surface integrity (SI) of the AM-produced components are still the biggest challenge for industries [2]. The surface quality fundamentally displays the exterior surface of the manufactured part such as surface texture, roughness, lays, laps, tears, pits and other geometrical deviations. Whereas surface integrity reflects the interior properties of the surface, typically 0.1-0.5 mm below the surface of the manufactured part, which include microstructural alterations, intergranular changes, heat affected zone, microcracks, hardness alteration, residual stresses and material inhomogeneity, etc. Typically, for an engineering application where fatigue failures play vital roles, the demand for precision manufacturing (i.e., excellent SQ and SI) is high, as most of the failures occur due to poor SQ and SI of the component. Out of the various parameters of SQ and SI, roughness, residual stress (compressive), microstructure and microhardness play vivacious roles in deciding the service life of any AM or conventionally manufactured components [4-5]. These limitations do not allow AM to be used for critical parts, either because of technical or safety reasons. By employing the Laser Shock Peening (LSP), many of these limitations can be overcome, mitigated, or even completely eliminated. LSP can significantly improve the mechanical properties of the AM parts and bring AM technology into the most demanding applications and industries. In the present work, LSP on important industrial usage material classes namely SS 304L, SS 316L and AlSi10Mg has been demonstrated. The residual stress measurements were presented for SS 304L and SS316L samples, while the microstructure evolution of the same samples before and after LSP is also presented. The influence of LSP on the porosity of AM-produced AlSi10Mg is considered to study.
Experimentation: LSP experimental work has been carried out at HiLASE’ premises in the laboratory that is dedicated to LSP research. Figure 1 presents the scheme of the LSP arrangement. For all the experiments, a BIVOJ laser system was used with all the characteristics important for the LSP processing. The laser beam was specially fixed, and the samples were moved by the robotic arm with a predefined path. The post-LSP results such as residual stresses were measured by using the hole drilling method with the ‘Prism’ hole drilling machine produced by the company ‘Stresstech’. The surface morphology was investigated by scanning electron microscopy (SEM) (“Tescan” FE-SEM”), whereas the porosity was evaluated by using CT tomography.
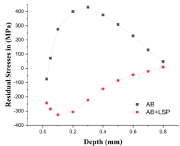
Experimental findings: Figure 2 presents how the LSP changes the state of residual stresses from the tensile regime to the compressive regime for additively manufactured samples made of stainless steel 304L. In this case, samples have not been heat-treated for stress relaxation, and this is the reason for the high tensile stresses. The laser energy per pulse for this processing was 5J, and we have used the sport size 2mm × 2mm. The pulse width was 14ns, and the corresponding power density was 4.9GW/cm2. Figure 3 presents what the residual stress profile looks like when the samples are heat-treated for the stress release purpose. In both cases, a significant amount of compressive residual stresses has been achieved deep into the material. In the end, this typically brings improvement in the fatigue properties of the part. The corresponding power density, in this case, was 2.5GW/cm2, achieving similar laser parameters as in the first case.
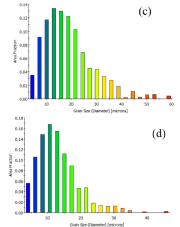
Figure 4 presents the electron backscattered diffractometer (EBSD) of the cross-sectional cut unpeened sample (Figure 4a) and laser shock peened sample (Figure 4b). Whereas, Figures 4c and 4d depict the grain size distribution over the area fraction within the unpeened and laser shock peened samples respectively. It can be seen by comparing Figure 4b with Figure 4a that the grain sizes have been reduced due to the transfer of shock waves, causing plastic deformation within the material. The observation can be further verified with the grain size distribution as presented in Figures 4c and 4d. It is visible from Figure 4d that grains of more than 40 microns were totally diminished from the measured range, and smaller grains from 2µm to 20µm have gathered the larger area. Such improvement in grain structures has resulted in higher values of compressive residual stresses as presented in Figure 2 also.
During printing, the strategies for the outer skin and inner infill differ. Where these two strategies meet, we are observing a systematical drawback which is the formation of porosity. This porosity was successfully mitigated by using LSP up to a certain depth as can be seen from the Computed Tomography scan results shown in Figure 5. The power density used during LSP processing was 3.6GW/cm2. Whereas, Figure 6 illustrates the fatigue lifetime improvement of AM Ti6Al4V alloy, widely used by many industries, achieved by LSP. The testing has been stopped when 10 million cycles have been reached without failure.
Conclusions
LSP is a promising method for the post-processing treatments of metal additively manufactured parts. It can completely change the state of residual stresses in the additively manufactured part from tensile to a compressive state of residual stresses. By imparting high compressive residual stresses, deep into the part, LSP can significantly prolong the lifetime of the component that is additively produced and make it available for applications that require the highest quality. The refinement of the microstructure is another benefit that LSP brings to additive manufacturing. Also, the mitigation or complete elimination of the porosity, which is often a problem for additive manufactured parts, is possible with LSP. Furthermore, LSP can be applied to most engineering materials irrespective of their material properties. Certainly, LSP is a superior technology for certain improvements in AM.
References:
DebRoy, H.L. Wei, J.S. Zuback, T. Mukherjee, J.W. Elmer, J.O. Milewski, A.M. Beese, A. Wilson-Heid, A. De, W. Zhang, Additive manufacturing of metallic components – Process, structure and properties, Progress in Materials Science, 92, 2018, 112-224.
Zulic et al. (2022). Fatigue Life Enhancement of Additive Manufactured 316L Stainless Steel by LSP using a DPSS Laser System, Surface Engineering. 38(2), 183-190.
Vrancken et. al. Heat treatment of Ti6Al4V produced by Selective Laser Melting: Microstructure and mechanical properties, Journal of Alloys and Compounds, Volume 541, 2012, Pages 177-185
Pathak S., et al (2022). Post-processing of selective laser melting manufactured SS-304L by laser shock peening. Journal of Materials Research and Technology, 19, 4787-4792.
Pathak et al. (2023). Surface Integrity of SLM Manufactured Meso-Size Gears in Laser Shock Peening without Coating. Journal of Manufacturing Processes. 85, 764-773.
For Information:
Sanin Zulića, Sunil Pathaka,
aHiLASE Centre, Institute of Physics of the Czech Academy of Sciences, Na Slovance 1999/2, Prague, Czech Republic
E-mail: sanin.zulic@hilase.cz


![Figure 1: Schematic of the laboratory for LSP at HiLASE Center [2]](https://mfn.li/storage/e-archives/article-pictures/2298/7216.gif)


