E-Archive
Interview
in Vol. 8 - May Issue - Year 2007
A Passion About The Measurement Of Residual Stresses

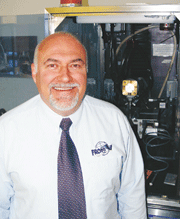
Michael Brauss, President of Proto Mfg.

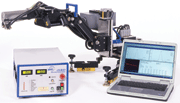
Overall Perspective of Stress Measurement System

EPRI X-Ray Head

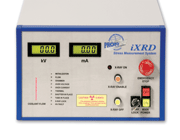
Control Box of iXRD Stress Measurement System
MFN met Michael Braus, the president of Proto Manufacturing for the first time in 2002 in Garmisch-Partenkirchen, Germany at the International Conference on Shot Peening. It was inspiring to talk to such an interesting personality and ever since Michael has not only written a number of articles for MFN, but is also co-author of the book "Shot Peening". MFN took the chance to ask some more questions.
(?) MFN: Proto Manufacturing first appeared in our magazine in 2002, and now it is 2007, five years later. From your perspective, what important trends have you seen in the metal finishing world in the last five years?
(!) M.B.: I would say the biggest change that we have observed may actually be in the way some providers and end users of metal finishing products and services think about residual stress. There is a growing understanding of the importance of residual stress and its effect on fatigue life, Stress Corrosion Cracking (SCC), Hydrogen Induced Cracking (HIC) distortion, peen forming, crack initiation and crack growth. Furthermore there is increasing recognition of the need to characterize the residual stress on the actual part at the critical locations as opposed to relying on the Almen strip alone and trying to infer from it the residual stresses introduced into the part as a result of a metal finishing process.
(?) MFN: What do you attribute to this change in thinking to?
(!) M.B.: The increasing competitive pressures in play today have resulted in many of our customers needing to place actual residual stress values on part prints and specifications to insure adequate part performance. This is in contrast to what has been more commonly done in the past with the use of a shot peening specification. The key difference between the two approaches is that the quantitative residual stress specification can be used as quality control metric to verify or reject the actual part simply by nondestructively measuring the residual stress in the part and comparing that result to what is specified on the print. This offers an ability to reduce the variance in RS at manufacture and also to provide verification of actual part quality at the receiving point. In the case of a shot peening specification there is no direct means to ascertain if the part was indeed peened to the specification other than through records and even then the Almen strip data cannot provide reliable information relative to the residual stress level in the actual part. The problem lies in the fact that the Almen strip cannot take into account the processing history of the actual part, for example, was the heat treatment done properly? Was there abusive machining? And so forth.
(?) MFN: Does that mean the Almen strip is obsolete?
(!) M.B.: Not at all, the idea is to use the Almen strip as part of your metal finishing process control procedure for the equipment used, but use quantitative residual stress characterization on the actual part at the critical locations to control the part quality.
(?) MFN: You mentioned increasing competitive pressures are responsible for this greater awareness in residual stress. Can you be more specific?
(!) M.B.: Sure, let’s start with the automotive industry where there are multiple pressures at play. For example the need to achieve predictable and reliable quality goals by avoiding component failure within the extended warranty period is one. The requirement to push more torque through a given power train without a lengthy and expensive component redesign is another example. The need to reduce vehicle weight is one more example. All the above can be achieved with careful management of residual stress.
(?) MFN: How about the aerospace industry?
(!) M.B.: Well here the pressure on the OEM is to reduce weight while at the same time increasing quality and performance. The end user has to maintain operational capability with an ever aging fleet with a decreasing maintenance budget. In some cases Condition Based Maintenance (CBM) programs are introduced to help achieve “up time” goals while reducing costs by making repair or replace decisions on parts based on the actual individual part condition rather than general accumulated hours. Here again residual stress data can help achieve the goals in two ways, first verify that the new part or structure has the appropriate residual stress in the critical life limiting locations from the start to maximize fatigue life. Second measure the part at every practical opportunity and track the residual stress data by part number and serial number. Add the accumulated residual stress data to the operation data from the various real time sensors and voila, you have a reality based CBM capability.
The power generation industry where long term performance is required without any costly unscheduled downtime offers another example. One of the most significant re-occurring problems in the power generation industry is Stress Corrosion Cracking (SCC). For SCC to occur you need a susceptible material, a corrosive environment and tensile residual stress. Take away any one of them and you no longer have SCC. Residual stress characterization and management can help achieve the goal by identifying the presence of tensile stress and verifying the management process applied.
(?) MFN: What kind of competitive pressures does Proto Mfg. feel?
(!) M.B.: Well, for us the pressure is always to provide fast, quantitative, accurate, repeatable measurement capability in our systems and services on more and more difficult material conditions and geometries. Fortunately with our continuous internal and external R&D we have been able to meet most of the challenges presented to us thus far. For example we are just completing a joint R&D project with EPRI (Electrical Power Research Institute) in which we have developed a small instrument capable of measuring residual stress inside a 50 mm internal diameter (I.D.) pipe up to 8 meters into the pipe. This is quite a breakthrough. We have also developed an instrument capable of measuring residual stress in the I.D. of very small holes in jet engine disks. We are currently developing a special portable instrument for the Navy which will enable the quantitative characterization of cold worked holes.
(?) MFN: Why did you choose x-ray diffraction to measure residual stress as opposed to other methods?
(!) M.B.: There are a number of very compelling reasons we selected x-ray diffraction as our method of choice. I should hasten to add that we do use many other techniques in our pursuit of residual stress data, but the bulk of our residual stress characterization is done via x-ray diffraction. The primary reason is that we are in the business of providing the best, most accurate, reproducible, quantitative residual stress data possible to our system and service customers. Currently only x-ray diffraction provides us with the nondestructive, quantitative, accurate residual stress data with the appropriate volumetric resolution and measurement speed needed to be sufficiently robust and practical in serving our customer’s needs.
(?) MFN: But isn’t x-ray diffraction one of the most expensive methods out there?
(!) M.B.: This is a commonly held misconception. Though the initial cost of x-ray diffraction instrumentation is higher relative to other methods, it may surprise you to learn that when you take into account the cost of the technician’s time and the required consumables necessary for a given measurement, our x-ray diffraction based systems are by far the lowest cost performer for a quantitative measurement technique. Many of our system customers experience a typical return on investment in less than 4 months.
(?) MFN: What is next for Proto Manufacturing?
(!) M.B.: I am very pleased with the growth of Proto in general and in particular with our new Ypsilanti Michigan facility. We have a wonderful team of creative and motivated people who take a great deal of pride in what they do. So I am really looking forward to a future of strong growth and exciting innovations. And let me thank you and your readers for allowing me the opportunity to speak about something I am so passionate about.
We at MFN would like to thank Mr. Michael Brauss for this interview.
For Information:
Proto Mfg .Ltd
Oldcastle, Ontario N0R 1L0, Canada
Tel. +1.519.737-6330, Fax 737-1692
Proto Mfg. Inc.
Ypsilanti, Michigan 48198-6010, USA
Tel: +1.313.965-2900, Fax 887-0977
Toll Free USA and Canada: 800 956-8378
E-mail: proto@protoxrd.com
www.protoxrd.com


