E-Archive
Science Update
in Vol. 10 - May Issue - Year 2009
A Numerical Study of Intensity and Surface Coverage in the Shot Peening Process
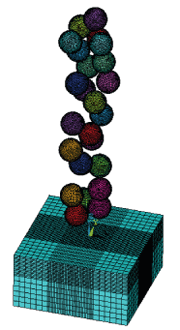
Fig. 1: 3D random Finite Element Model of shot peening
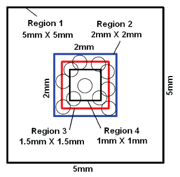
Fig. 2: Representative surface

Fig. 3: Schematic view of shot peening on a strip with dimensions 76
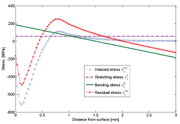
Fig. 4: Stress profiles calculated from induced stress (Stretching stress, Bending stress and Residual stress)
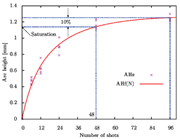
Fig. 5: Relation between arc heights and number of shots
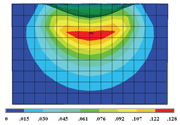
Fig. 6: Von Mises equivalent plastic strain contour after one impact
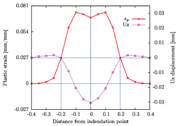
Fig. 7: Von Mises plastic strain profile and vertical displacement profile after one impact

Fig. 8: Surface von Mises equivalent plastic strain contours after two different random impacts. (a) 12 random impacts, surface coverage equals to 63%; (b) 24 random impacts, surface coverage equals to 92%
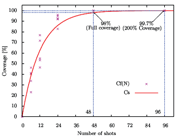
Fig. 9: Relationship between coverage and number of shots
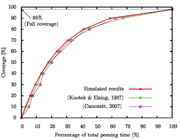
Fig. 10: Relationship between peening coverage and percentage of peening time
1. Introduction
Shot peening is widely used to improve the fatigue life of metallic components in the aerospace and automobile industries. Various studies indicated that this improved fatigue life is mainly due to the peening-induced layer compressive stress, which retards crack initiation and slows down crack propagation under cyclic loading conditions [1-3]. The effects of most shot peening parameters on the residual stresses have been studied by theoretical and numerical analyses as well as through experimental work. However, investigations related to control parameters such as shot peening intensity and peening coverage were performed mainly through experiments.
Almen tests were introduced by John Almen [4] for evaluating the intensity of a shot peening process. An Almen test consists in peening a set of standardized strips of given dimensions and material, called Almen strips, which are successively fixed to a mounting fixture and peened under different shot peening durations. Once the four roundhead bolts constraining the strips are removed, the strips will curve towards the peening direction. Shot peening saturation is defined as the point, on the curve of arc height versus peening time, beyond which arc height increases by less than 10% when peening time doubles. The arc height at saturation is a characteristic value for a given combination of peening parameters, and is therefore called Almen intensity.
Coverage is defined as the ratio of the area covered by peening indentations to the total treated surface area, expressed in percentage. A surface coverage at 98% is usually considered as a full coverage for practical reasons. Indeed, the maximum coverage that can be assessed visually is around 98%, since coverage percentages are difficult to discriminate as 100% coverage is approached. Moreover, 200% coverage is defined as peening twice the required exposure time for reaching full coverage (98%) according to SAE J443 [5]. In practice, coverage evaluation is performed mainly by visual inspection.
The objective of this work was to develop a model representative of the real shot peening process. The presented 3D finite element model with numerous randomly distributed steel shots bombarding an aluminium component allows in-depth studies of saturation, intensity and coverage development.
2. Finite Element Model
Shot peening simulations were conducted using the explicit commercial finite element code LS-DYNA. Figure 1 presents the finite element model with the aluminium target component and a stream of randomly distributed shots.
The dimensions of the target block in the FE model are 5mm×5mm×3mm. After convergence study, cubic brick elements with dimension of 0.05mm were chosen for the impact area identified as region 2 in Figure 2, with dimension of 2mm×2mm×1mm. Every impact center lay inside region 3 with dimension of 1.5mm×1.5mm. Region 4 with dimension of 1mm×1mm was selected as a representative surface to study peening coverage. The volume underlying Region 4 was selected as a representative volume to study intensity, saturation and average residual stress profiles. Displacements on the four side surfaces and bottom surface of the target block were constrained.
The stream of shots consisted of spherical steel shots of radius 0.5mm normally impacting the target surface at a velocity v=50m/s. Each peening simulation used random initial distribution of shots over the impact area. In order to consider the influence of the number of impacts as well as the influence of random impact sequence and location, 5 independent simulations were carried out for each of the following numbers of shots: N= {6, 12, 24, 48 and 96}.
The target component is assumed to be made of high strain aluminium, following a bilinear isotropic elastoplastic hardening behavior with elastic modulus E=71.7GPa, Poisson's ratio ?=0.33, yield stress ?y=503MPa, tangent modulus H1=3.3GPa and density ?t=2810kg/m3. Steel shots of density ?s =7800kg/m3 are assumed to be rigid due to their relatively high rigidity and hardness values compared with the target aluminium.
3. Shot Peening Intensity and Saturation
3.1 Induced stress and residual stress profile
Almen tests are performed using standard Almen strips, made of SAE 1070 cold rolled spring steel. However, shot peening is not restricted to steel and can be performed on various materials. In this paper, shot peening on an aluminium component was simulated. The average induced stress in the representative volume of the FEM is assumed to be representative of the peening-induced stress in an aluminium strip with dimension of 76mm×19mm×3mm, similar in dimension to an Almen strip but slightly thicker.
During an Almen test, the strip is fixed with bolts as shown in Figure 3(a). An induced stress profile in x-direction as shown in Figure 3(b) is produced due to the gradual plasticization of the surface layers. The induced stresses are not self-equilibrated and tend to stretch and bend the strip, but these deformations are constrained by the rigid support and bolts. We can thus consider that a compressive force Fx and a bending moment Mx are applied on the strip to maintain its original shape. The resulting residual stress profile can be calculated with equations introduced by Li [6] and Guagliano [7]. Equations (1) and (2) are the force and moment equilibrium equations:
Mathematical formula cannot be displayed on web version (1)
Mathematical formula cannot be displayed on web version (2)
here b=19mm is the width and h=3mm is the thickness of the strip.
After the release of the rigid constraints, the originally flat strip will stretch and bend, as shown in Figure 3(c). It is assumed that no additional plastic strain will occur during the release. The resulting bending can be calculated using the superposition principle, the flat component being subjected to the inverse of the force and moment calculated from Equations (1) and (2). Therefore, it is possible to calculate the residual stress profile after the deformation of the strip with Equation (3) [7]:
Mathematical formula cannot be displayed on web version (3)
Preliminary simulations showed that the influence of the peening-induced stretching force on the arc height of the strip is negligible. In addition, for this specific rectangular strip, the length is four times the width, so the arc height along the length is 16 times of which along the width. Therefore, only the result along the length direction is considered and expressed as function of the peening-induced bending moment as in Equation (4) [7]:
Mathematical formula cannot be displayed on web version (4)
where l=76mm is the length of the strip.
3.2 Saturation curve and intensity
In this study, five simulations were performed for each number of shots N= {6, 12, 24, 48 and 96}. For each simulation, the average induced stress was obtained and the resulting arc height of the simulated strip calculated.
Figure 4 presents each item in Equation (3) for a typical simulation with 48 impacts to show the relationship between the induced stress , stretching stress, bending stress and residual stress . It can be found that the induced stress shows large values in compression on the top layer of the component and vanishes midway through the thickness. In contrast, the residual stress has compressive value not only on the top layer of the component, but also on the bottom layer of the component.
Figure 5 presents the 25 calculated arc height values. An equation of the form
Mathematical formula cannot be displayed on web version (5)
was fitted according to a least squares criterion through these simulation results. With the help of Equation (5), it is possible to calculate the saturation point. Saturation of the aluminium strip, according to the Almen intensity definition, was obtained for N = 48, which corresponds to a calculated deflection of 1.14mm for the simulated peening conditions.
4. Peening Coverage
Figure 6 presents the von Mises equivalent plastic strain contour after one vertical impact. It can be noticed that the maximum plastic strain is beneath the impact point. Figure 7 shows the plastic strain and the vertical displacement profiles at the component surface. A circular indentation is obtained for a single vertical impact. Therefore, the results are presented for a plane passing through the indent center. Not considering the pile up around the indentation as being part of the indentation, it can be seen that an indentation of radius r = 0.2mm was obtained for this shot peening case. It can also be seen that the von Mises equivalent plastic strain is equal to 0.027 at the boundary of the indentation. From this observation, we considered all surface points with the von Mises equivalent plastic strains greater than 0.027 as pertaining to an impacted area. This definition enables us to compute the coverage as the ratio of the number of nodes with plastic strain larger than 0.027 to the total number of nodes on the representative surface (441 nodes).
Figure 8(a) and 8(b) presents surface von Mises equivalent plastic strain contours after 12 and 24 random impacts respectively. A peening coverage 63% can be calculated for 12 impacts and 92% for 24 impacts.
Figure 9 presents the peening coverage results Cs for the 25 simulations. An Avrami equation
Mathematical formula cannot be displayed on web version (6)
where N is the number of shots was fitted through this data with the fitting parameter m=0.082.
From this Avrami Equation, it can be calculated that coverage reaches 98% or full coverage for N=48. In addition, a 200% coverage is reached with N=96 under these specific peening conditions according to the definition from SAE J443 [5].
Figure 10 illustrates the relationship between peening coverage and percentage of total peening time, defined as the ratio of the number of shots to the total number of shots for 98% peening coverage. Simulation results are presented, together with experimental results obtained by Knotek & Elsing [8], where steel shots with r=0.9mm impacted 50CrV4 steel with v=52m/s and by Cammett [9], where S280 steel shots impacted 4340 Steel with Almen intensity equal to 9A. It can be seen that the simulation results are very consistent with these experimental results from the literature.
5. Conclusion
Almen intensity and coverage are two important control parameters of the shot peening process. In this paper, a finite element model has been developed to relate them to the number of random shots or to the peening duration. Saturation was related to peening-induced stress profiles and a new method for evaluating surface coverage from simulation results was presented. Saturation in the sense of Almen test was obtained for N=48 impacts for the shot peening conditions simulated. Full coverage was also obtained for N=48 impacts.
This novel model is believed by the authors to be more representative of the real shot peening process than conventional models, since it considers the randomness of impact sequence and location. Refinement of the model and additional investigations based on it should lead to new and better understanding of the shot peening process.
References
[1] Y. Mutoh, G..H. Fair, B. Noble and R.B. Waterhouse, 1987. The effect of residual stresses induced by shot-peening on fatigue crack propagation in two high strength aluminium alloys. Fatigue & fracture of engineering materials & structures, 10(4), 261-272.
[2] S. Curtis, E.R. de los Rios, C.A. Rodopoulos and A. Levers, 2003. Analysis of the effects of controlled shot peening on fatigue damage of high strength aluminium alloys. International journal of fatigue, 25, 59–66.
[3] C.H. Wang, S.A. Barter and Q. Liu, 2003. A closure model to crack growth under large-scale yielding and through residual stress fields. Journal of engineering materials and technology, 125, 183-190.
[4] J. Almen and J.P.H. Black, 1963, Residual stresses and fatigue in metals. McGraw-Hill, Toronto, 64-69.
[5] SAE Surface Enhancement Division, 2003, SAE Standard J443 – Procedures for Using Standard Shot Peening Test Strip.
[6] K. Li, 1981, Using stress peen-forming process for integrally stiffened wing panels, Proceedings of the 1st International Conference on Shot Peening, 555-563.
[7] M. Guagliano, 2001, Relating Almen intensity to residual stresses induced by shot peening: a numerical approach, Journal of materials processing technology, 110, 277-286.
[8] O. Knotec and R. Elsing, 1987. Computer simulation of different surface topographies of metals produced by blasting processes. Proceedings of the 3rd International Conference on Shot Peening, 361-368.
[9] J. Cammett, 2007. Shot peening coverage – the real deal. The shot peener, 21(3), 8-14.
Aerospace Manufacturing Technology
Center, National Research Council Canada
* Département de Génie Mécanique, École Polytechnique de Montréal, Canada
E-mail: hong-yan.miao@polymtl.ca


