Workshops / Training / Consulting
![]() Hands-on Training
Hands-on Training
- Ervin Tester
- Flap Peening
- Residual Stress Measurement by X-Ray Diffraction
- Sieve Analyzer
- Almen Gages and Holders
![]() Hands-on Training with Flap Peening
Hands-on Training with Flap Peening
MFN is able to demonstrate the method for choosing a rotation speed (RPM) on a flap peening device that would yield a given intensity on the Almen gage. After peening a specimen it is possible to show the similarity to specimens that had been peened in the Ervin tester. The visual difference is the shot size. This is demonstrated with the Ervin test as well as with two different shot sizes. The next step shows how easily an aluminum extrusion is saturation peened. One of the attendees is given the chance to feel the tool at work and to realise how the flap finds the correct height almost by itself. It also highlights how the flap sounds when correctly applied or not. Using some pre-stress one can use the flap for forming or straightening a part. That is done by taking two sections of an aircraft quality aluminum alloy 2024 T3511extrusion angle and clamping them together using a small metal block in the center to create an elastically curved section. It is proven by releasing them and they are fixed back to back without spacing. Then they are again clamped and flap peened. On release it is shown that placing them back to back the procedure has given the angle a curve, even working against the stiffening leg. An addition is a rotor with a Scoth-brite pad that improves the surface finish of the formed part without loosing the shape. This is important as it shows that after applying the peening one can smooth the surface and still retain the fatigue benefits.
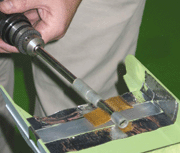
Close-up of Flap Peening
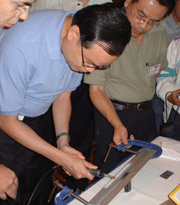
Student trying Flap Peening